
How to Make a Curriculum Map: Step by Step Guide for Teachers
Ever feel like you're flying by the seat of your pants, scrambling to cover all the standards before the school year ends? Without a clear plan, it’s easy to lose track of what’s been taught and what content still needs attention.
My district usually gave us a general plan, but it was hard to follow - especially when the plans didn’t incorporate time for testing, field trips, and other interruptions.
The generic plans also lacked time to address skills students needed but didn’t have.
And we all know that district-created timelines are frequently unrealistic - completing a unit often took far longer than the time allotted in the provided plan.
What are the Benefits of Curriculum Mapping for Teachers?
A curriculum map is a plan that outlines the content, standards and skills to be taught during the school year. Creating a plan allows you to logically sequence your standards and pair them with skills, as well as to spiral previously learned skills throughout teaching units.
Once I created a curriculum map for myself, I felt less stressed and better organized. I could easily see how much time I had for each unit.
Having a scope and sequence mapped out also prevented me from spending far too much time on one unit - and running out of time to cover the rest of my standards.
Even better: I no longer felt like I was running a planning marathon, with no finish line in sight.
Yes, it took some time to create the map the first time, but once I had it, I could easily adjust it and reuse it each year. In the long run, spending the time upfront saved me hours and hours of time the rest of the year.
How Can Curriculum Mapping Improve Student Learning Outcomes?
Having a curriculum map will ensure your lessons are focused on the content and skills students need to master.
The standards are the basis of a curriculum map. Spending time learning your standards helps you see where your students are at the beginning of the year and where they need to be by the end.
Analyzing your standards allows you to group them into units. Within each unit, you can build students' knowledge and address gaps they may have in their knowledge or skills.
How Do You Create a Curriculum Map?
Here are the steps I use to create a curriculum map:
Analyze Course Standards
I prefer to print my standards because I find it easier to visualize how I will group them into units. Language arts, social studies, and science can be grouped by topic or thematically. Math tends to be more straightforward.
I spend time learning what the core topics are in my course and what students are expected to learn. I look to see if there are overarching questions: are students expected to learn similar concepts across each unit? Some teachers prefer to create units based on a theme, while others focus on a topic.
Examples:
ELA units might focus on themes like What is courage? or topics such as a specific genre.
Geography might have units focused on the themes of geography or topics such as geographical regions.

I use these printable pages to analyze my course standards and track when I have taught them. They are available in both Florida BEST standards and Common Core State Standards. Just click the image above and use the store categories on the left to help you find the ones you need.
Determine Time Frames
Before I estimate the number of weeks I have for each unit, I grab a calendar and mark all the school holidays, major testing dates, field trips, etc. (I mark off times I know I won’t have a normal class schedule.)
I also like to preserve a few days at the end of each marking period for catch-up days - there are always things that pop up or students need more time on something.
Once I have the calendar marked, I count the number of weeks I have left to teach and write that number down.
It might seem smart to divide that by your number of units, but not all units will be an equal amount of time. If this is your first time teaching the course, it might be hard for you to estimate how much time to set aside for each unit. If this is the case, check with another teacher if you can.
If not, one way I have estimated units is to check how long the textbook chapters are. By looking at the number of lessons in each chapter, I get an idea of the time needed for each unit.
Finally, I estimate a number of weeks for each unit and write those down.
Order the Units
I now decide the order of my units and assign them to a marking period. I try to have at least two units per marking period, but that isn’t always possible.

I group the standards into units, then plan when I will teach each unit. (Graphic organizer shown is included in my Curriculum Map & Pacing Guide Editable Templates.)
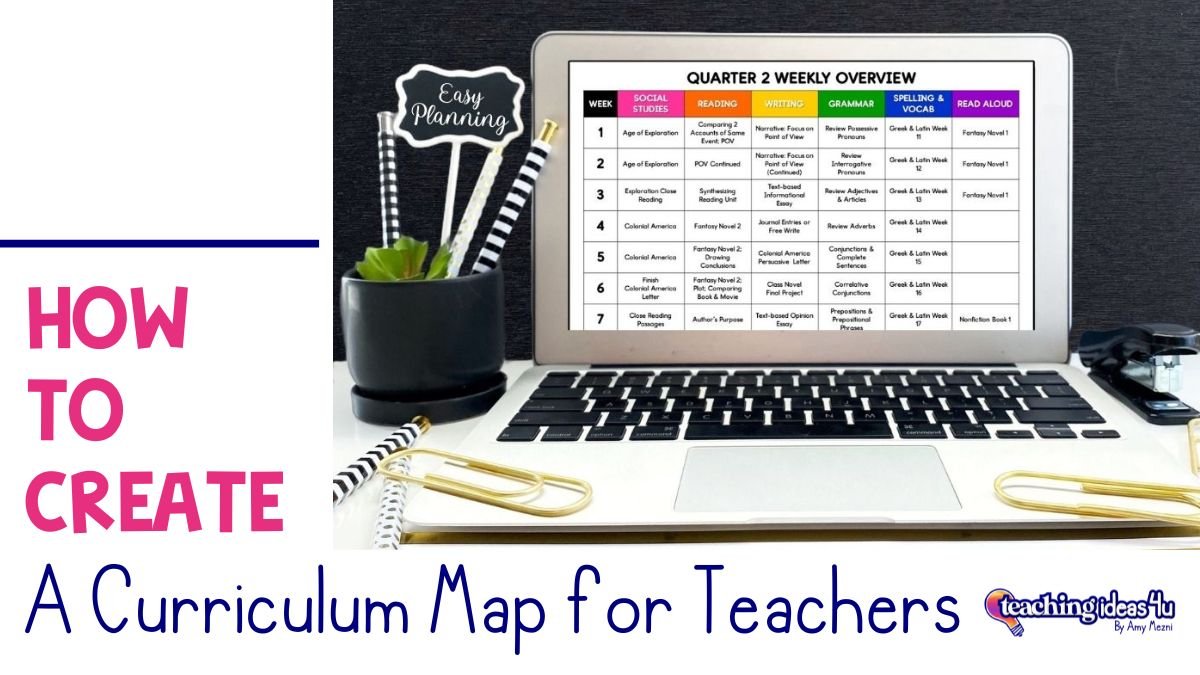
Plan the Weeks
Now that I have my units placed in a marking period, I plan out the weeks. I make a spreadsheet with 9 weeks and multiple columns. There are different ways you can label the columns. As an elementary teacher, I had a column for each subject, but I also preferred to break language arts into multiple columns (reading, writing, spelling, etc.).
Once I have the blank spreadsheet set up the way I want it, I duplicate it so I have one for each marking period. (If you do trimesters, then you would want to adjust this to fit your schedule.)
Label each sheet with a marking period and mark out weeks you know will have testing of other major interruptions.
Next I use my estimated weeks per unit to plan my marking periods.
For example, if US Geography is my first unit, I block out week 1 for introductory activities and interruptions, then I highlight the number of weeks I think I need for my geography unit.
I continue marking each unit until I have each week allotted for a specific unit.

Expanding my monthly outline into a weekly plan allows me to break down my course so I can plan to integrate topics and skills. (Graphic organizer shown is included in my Curriculum Map & Pacing Guide Editable Templates.)
Make Adjustments
As I previously stated, I prefer to leave some breathing room. If my estimated weeks have ended at bad times, I make adjustments.
I don’t want a unit to end during a report card week. That just leads to sleepless nights for you, grading assessments and getting them into the gradebook.
I also don’t want units to end after a major holiday. For example, I will adjust a unit to end before winter break. I do not want to have students take an assessment right after two weeks off.
If possible, I try to leave three or four weeks open throughout the year. That gives me some wiggle-room if something runs over my estimated time.
Develop the Units
Before I plan the units, I like to sketch out what I have to teach in each one. If this is your first year teaching the class, you may want to do this part one unit at a time.
If you have previously taught the course, you can fill in the activities and assessments you know you use in each unit.
I use this overview for a number of reasons:
to make sure I am incorporating a variety of assessment types.
to make sure I am covering the standards.
to remember the resources I have and like to use.

Making a rough plan of a unit helps me not only manage my class time but also remember which resources I have to use. (Graphic organizer shown is included in my Curriculum Map & Pacing Guide Editable Templates.)
Revise the Curriculum Map
Now that you have your curriculum map created, remember to edit it as you teach the units. If you update the plan as you go, your map will be more accurate for next year!
Get a Head Start on Your Curriculum Map
Save time creating your curriculum map with my Curriculum Map & Pacing Guide Editable Templates. It includes 95 editable organizers in both PowerPoint and Google Slides. Click here to learn more.
